![]()
Tutorials:
Wooden Sheaths

Click on any of the thumbnails below for a more detailed photo
|
|
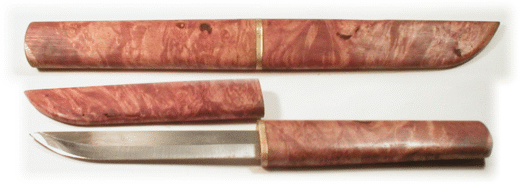
After writing the tutorials on leather and knife sheaths, I started to wonder why they couldn't be made out of wood also. About this time, I came across some excellent pictures of some Japanese influenced designs made by Scott Slobodian in Knives 2002 or 3. Please don't think I would ever for a second compare myself to the superb artistic skills of this craftsman, but he does give a goal to strive for. Maybe someday/ | |
 |
The components are simple. I'm going to use the NCK112 5" Puukko , the NCK067B machined brass guard and a nice block of maple burl I had sitting around. You'll need a block about 12" long. I had considered cocobolo also for a super elegant look. | |
 |
I normally leave the black scale (A remnant of the tempering process) on the blade, but for this project, I'm going to sand it off. Yike! Be careful . I always tape the edge for safety, but couldn't do that for this operation. Use a well worn sanding belt, go slow and always keep you eye on the blade. This operation scared even me. | |
 |
I split the maple wood block vertically lengthwise on the bandsaw. It's hard to see in the photo, but I hot melt glued the block to the side of a 2 x 4 to hold it perfectly at 90 degrees during this operation. | |
 |
Trace the blade outline on the outside and inside of the block with a heavy pencil. The inside outline will show you where to hollow the block for the blade. The outside outline will help you remember where the the blade is after it's glued inside the block | |
 |
To hollow the inside, I used a Dremel Mototool with router attachment and a 1/8" carbide rasp. Adjust the depth to the thickness of the blade. Easier to measure it against the blade than to try to measure the actual thickness of the blade. | |
 |
Rout out the handle following the penciled outline. Go slow to keep control since this thing has a tendency to go in all directions. Routed interior should be just slightly oversize for a slightly loose fit on the blade | |
 |
Test fit often. | |
 |
Tape the blocks together to cut them in half, with a front and a back half. We can do some touch up later but try to get as close to 90 degrees as possible. | |
 |
Glue the back halves ( the handle part ) together with a good quality wood glue and clamp overnight. Notice the reference lines we left on the outside of the handle. | |
 |
File the inside of the machined guard for a good, tight fit on the blade. Now is also a good time to square off the inside shoulders of the blade where the tang meets the blade itself. Test fit often for a good, tight fit. | |
 |
Polish the guard on a worn belt on the sander. Much easier to do it now than after it's mounted. I used a disk sander to square up the inside of the handles to get them to sit against each other nicely. Go slow, don't sand too much off and test fit often. | |
 |
I used a good three hour epoxy to fill the tang hole . I had previously drilled a 1/16" weep hole near the bottom to allow trapped air to escape . Slip the guard on and shove the tang of the blade into that gooey mess, fitting it tightly. The spring clamp holds the block vertical until the epoxy cures. Yes, it's messy. Have some denatured alcohol nearby to clean your hands. | |
 |
Start fitting the from of the sheath to the blade. Test fit and adjust as necessary. | |
 |
Glue the front half ( the sheath) together with a good carpenter's glue. Clamp overnight after making sure parts are in alignment. | |
 |
Now that you can't see the blade encased in the wood, that pencil outline comes in handy, doesn't it? I use a band saw and a belt sander to start bringing it into final shape. | |
| I used a natural penetrating oil finish to bring out the grain after final hand sanding. On mine, the sheath was slightly loose, so I used thin 1/32" balsa shims glues d inside the sheath part until I got a good, tight friction fit. Lovely. | ||