![]()
Tutorials:
Leather Sheath Kit

Click on any of the thumbnails
below for a more detailed photo
|
|
If you've never done any leatherworking before and want to try your hand at sheathmaking, consider starting with a Leather Sheath or Pouch Kit. Available in a couple of sizes, they may not fit every knife out there, but there are a great introduction to leatherworking. Basic in nature and easy to make, they can also be dressed up and modified to be a true work of art that you can be proud of. Lot of room for creativity here! | |
| Pretty complete kit includes the precut leather ( Surprisingly nice 8 to 9 oz. weight) , strap with pre-installed snap, stitching thread and needle, rivet, suggestions for decorative tooling, and directions. | ||
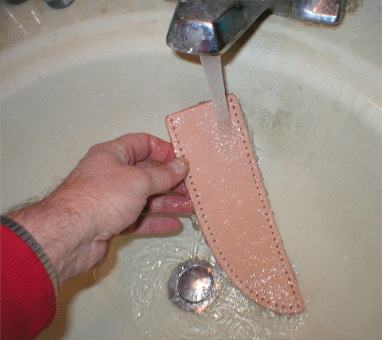 |
The plain sheath doesn't look too bad, but looks a lot better with a little bit of a pattern. Start by wetting the leather so that the embossing you do will be retained when it dries | |
 |
Embossing leather is a real art and I could do a whole separate tutorial on it ( after I learn how, of course). For now, I'm simply going to show you how to do a simple diamond pattern. | |
 |
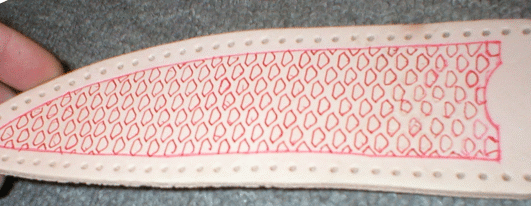
I found a piece of gutter guard mesh that has a nice diamond pattern and cut it to the approximate size of the area of the sheath to be embossed. Gutter guard mesh is cheap--a three foot piece cost me a buck. | |
 |
I freehand draw an outlined border with a fine line roller ball pen. The diamond pattern will stay inside this outline. | |
 |
Lay the metal mesh on top of the wet leather and trace the inside of the diamond patterns with a fine roller ball pen. Press hard to indent the leather and stay inside the outlined border. | |
 |
OK, this is what it should look like when you're done. Pseudo-snakeskin? I used a red roller ball so the dye I choose would cover the color easily. | |
 |
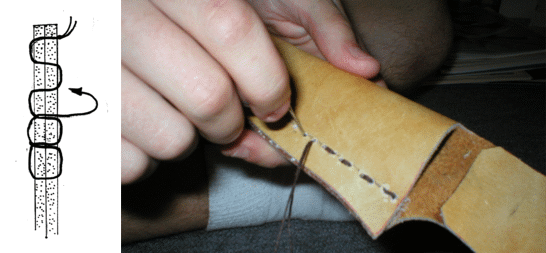
Start stitching the front and back together following kit instructions. Use a figure 8 stitch, following through from the first hole to the last, reversing and going back with stitches all the way to the hole where you started. Click here to see what a figure 8 stitch looks like. You might want to take note that they give you absolutely no extra stitching thread, so you have to watch what you're doing. | |
| Use the included rivet and your own rivet setter to attach the strap with the snap on it. The snap is already mounted so that simplify this step ( especially if you're like me and have trouble setting snaps). | ||
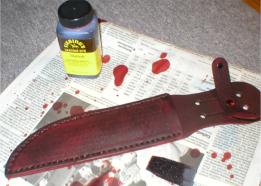 |
Now it's really starting to look like something: I use a small foam brush to color the sheath with a leather dye. I used maroon this time but there are a rainbow of colors available. Be careful with leather dye: if you get it on your hands or, it'll be there for a week. On carpets, it'll be there forever. | |
|
And this is what it should look like when complete. | |
| Leather stamping or engraving is a way to really dress up your work but is a specialized art that has special tools and would require a whole book to explain in detail. A good, inexpensive book to start with is The ABC's of Leatherwork. | ||
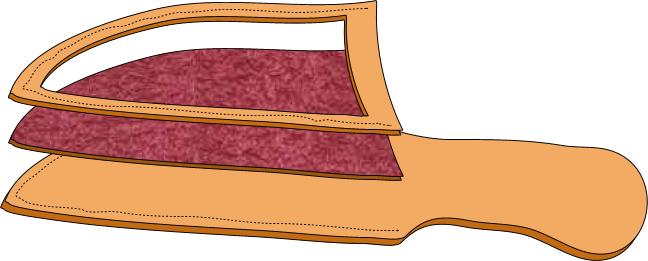 |
Another easy way to really dress up your sheath is with inserts. Cut out the center of the front part of the sheath to expose a more decorative leather ( or naugahyde, vinyl, whatever) which will be sandwiched in your new creation. Stitch as above. | |